Interactive Text
Because SVG text is part of the DOM, in an interactive web document, it can be updated or restyled in response to user interaction.
In the simplest version, the CSS :hover class can be used to show and hide text labels, thereby reducing the amount of visual clutter as the user explores the image.
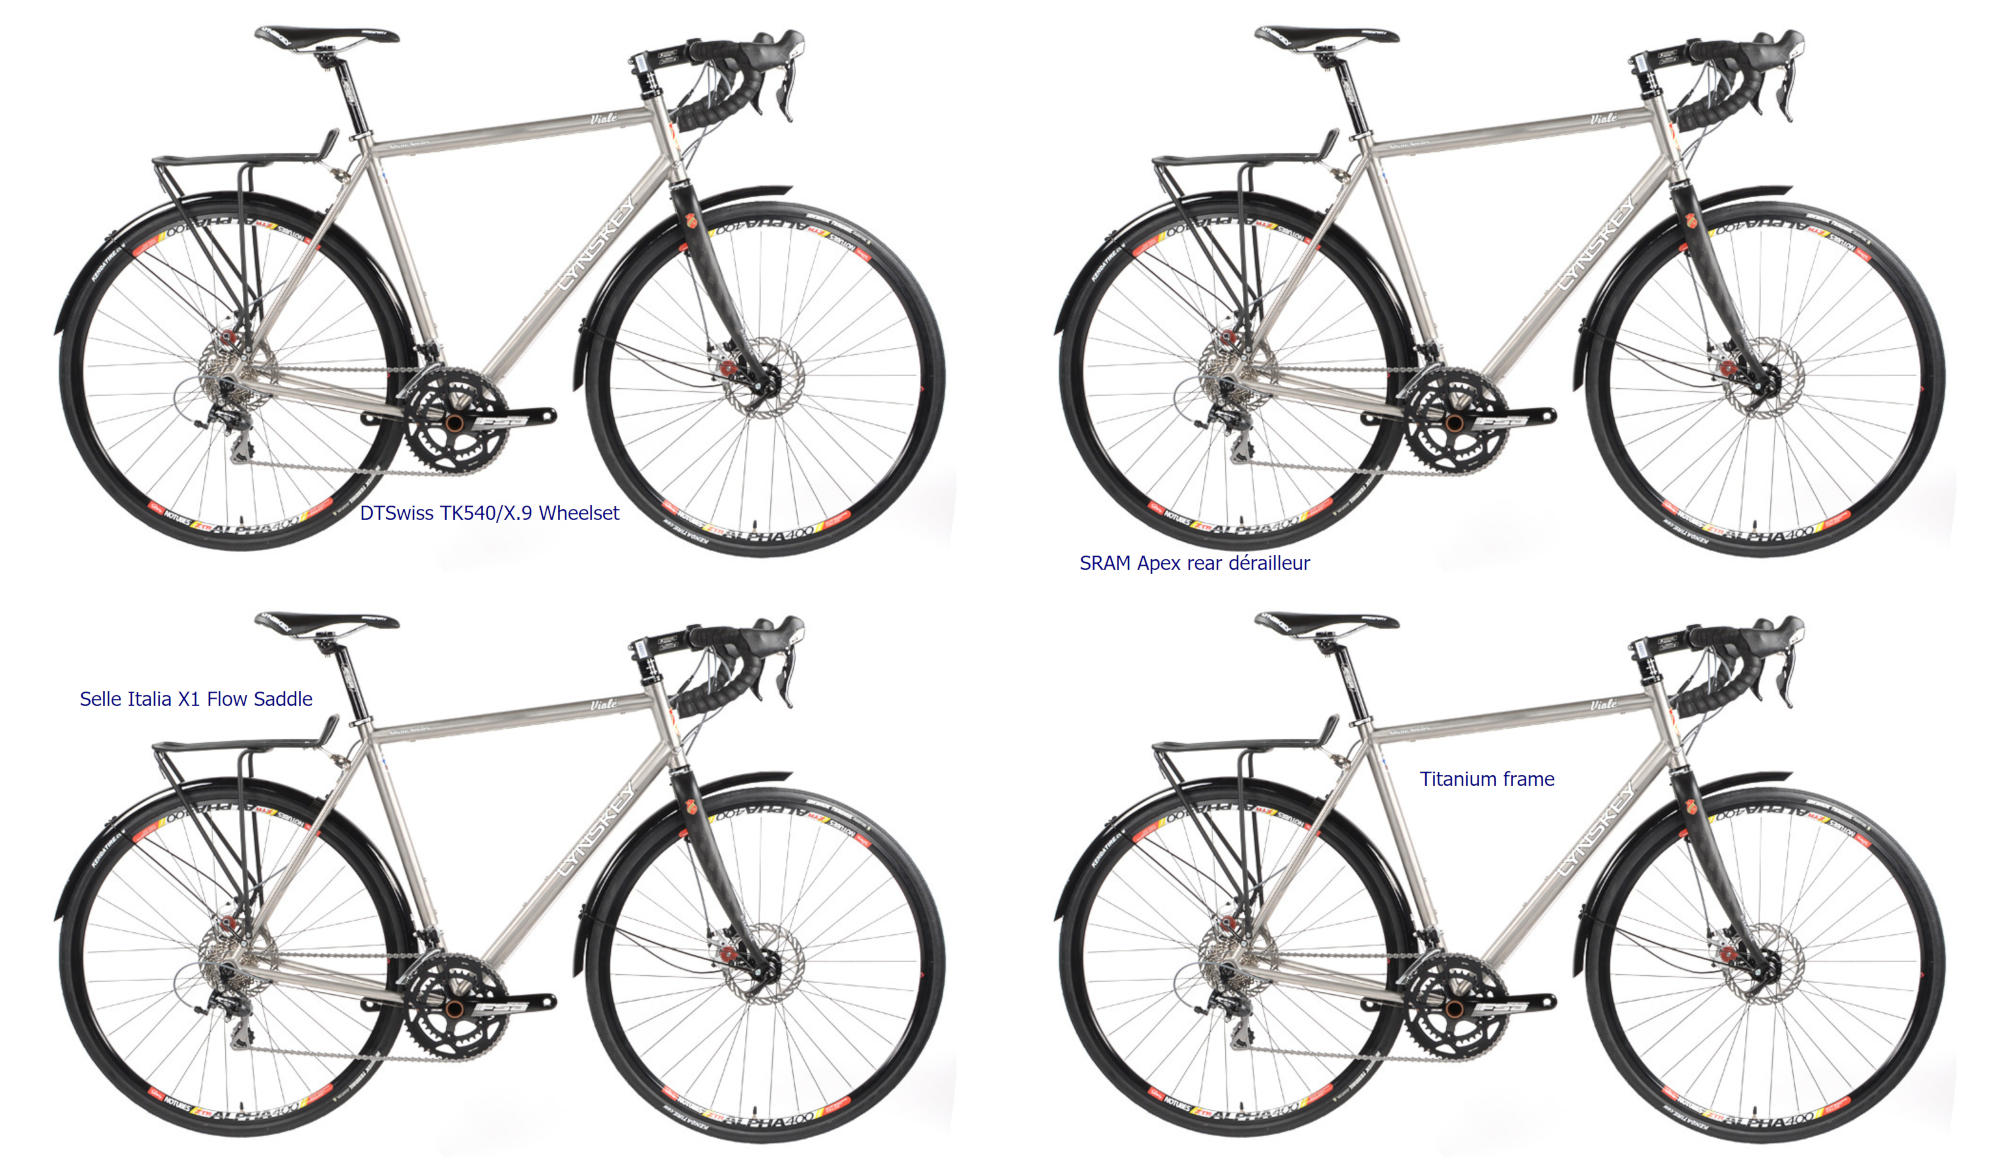
In Example 7-3, in the book, we added text labels to a product photograph of bicycle. Then, we showed how media queries could automatically increase the size of those labels when the graphic is scaled down.
With hover styles, we can hide and show those labels as the user explores the graphic, helping to focus attention on the individual parts.
We make the connection with invisible shapes that outline the features in the photograph that correspond to each label, turning the SVG into a simple image map. When the CSS registers a :hover on any of the shapes, the matching text element is revealed.
To keep things accessible, we’re only going to hide the labels if a hover-effect is detected somewhere on the SVG. Without mouse movement or active tap interaction, all the labels will display.
Tip
If the interaction was essential, we could make the elements keyboard-focusable and use the :focus pseudoclass, but too many tab stops can be an accessibility problem, too. So keyboard users will just see all the labels at once.
Example 7-X1 provides the complete code; Figure 7-X1 shows each label revealed in turn.
Example 7-X1. Making SVG text labels interactive on mouseover
SVG markup:
<svgxmlns="http://www.w3.org/2000/svg"xml:lang="en"xmlns:xlink="http://www.w3.org/1999/xlink"width="1000"height="586"viewBox="0 0 1000 586"id="lynskey"><title>Lynskey 2017 Vialé Technical Details</title><style>/* see below */</style><imagewidth="100%"height="100%"xlink:href="viale.jpg"/><g><circleclass="target"cx="770"cy="400"r="172"/><circleclass="target"cx="220"cy="380"r="172"/><textx="360"y="520">DTSwiss TK540/X.9 Wheelset</text></g><g><polygonclass="target"points="250,25 443,25 443,60 357,101 260,65"/><textx="80"y="120">Selle Italia X1 Flow Saddle</text></g><g><polygonclass="target"points="646,105 367,130 245,350 283,409 390,434 413,379 456,370 500,400 677,207 684,229 700,217 669,120"/><textx="420"y="200">Titanium frame</text></g><g><circleclass="target"cx="225"cy="400"r="55"/><polygonclass="target"points="210,400 230,480 260,480 280,390"/><textx="80"y="570">SRAM Apex rear dérailleur</text></g></svg>

-
Each
<text>label is now part of a group (<g>element) that also contains the shapes that outline the labelled regions of the photograph. 
-
The mouse-target elements include a mix of
<circle>and<polygon>elements. Thetargetclass will be used to make the elements invisible, so it doesn’t matter if the shapes are only rough approximations for the photographic regions. 
-
Although they won’t be displayed, the order of the shapes still matters: the dérailleur (gear-shift) region overlaps one of the wheels, but it is later in the document and therefore “on top” as far as mouse events are concerned.
CSS styles:
svgtext{font:20pxsans-serif;fill:darkBlue;transition:font-size0.5s,opacity0.3s;}@media(max-width:600px),(max-height:342px){svgtext{font-size:28px;}}@media(max-width:400px),(max-height:235px){svgtext{font-size:36px;}}.target{fill:none;pointer-events:visibleFill;}svg:hoverg:not(:hover)text{opacity:0;}
-
We previously added the
transitionproperty to smooth outfont-sizechanges from the media queries. An additional transition has been added for theopacityproperty of the<text>elements, so that the labels fade in and out neatly. -
The media queries for adjusting
font-sizeare as described in “Responsive Text Scaling” in Chapter 7 of the book. -
The shapes with the
targetclass aren’t painted (fillisnoneinstead of the default black) but they do respond to mouse-pointer events. ThevisibleFillvalue for thepointer-eventsproperty means that the fill region of the shape is active unless the shape is explicitly hidden with thevisibilityproperty, regardless of whether or not it is actually painted. (We discusspointer-eventsin more detail in Chapter 18.) 
-
When the SVG is hovered by a mouse pointer, the text elements are transparent (
opacity: 0), unless they are inside a group that is also receiving the mouse hover event. Theopacityproperty is used, instead ofvisibilityordisplay, because it can be smoothly transitioned, and because it doesn’t affect pointer events on the text itself.
Interactive effects don’t work in an SVG used as an image. Mouse events on an <img> element are handled by the parent document, not passed to the SVG.
However, as we discussed in the book, there are already many other reasons why this example shouldn’t be used in an image: the text would be inaccessible, and the external photograph file would not load! So this approach is for <object> or (with adjusted media queries) inline SVG, only.